Monday, January 28, 2013

"Take Wing" Mixed Media Card

Today is a blustery,rainy and I mean rainy day. The poor dogs and I got soaked just walking a short ways after my umbrella turned inside out. A perfect day for experimenting.

I must confess I bought a jar of Earth Safe Moulding Gel which has been gathering dust. No that is not a misspelled word. Moulding is what it says on the jar. Anyway I tried it a couple of times but was disappointed with my results. Not one to give up I decided to give it another try. It was an interesting learning experience.

O.K. I know you want to see the card. You don't want to read all of my ramblings.
First off I took a frame in Studio and made my shaped card. O.K. my card is taking flight because I did not think to put a straight line across the bottom. The panel is the same frame and I sized it so I could just have it hang over the top a little bit but still fit in a standard envelope. The tag is just a miniature version.

I cut the butterflies a silhouette freebie, my lattice file which I have no idea where I got it,the panel and card shape from gray card stock I bought by mistake. The gray is growing on me. Anyway it was a mistake to cut the butterflies out of the card stock and I'll tell you why later. All part of the learning experience. If you are going to use ink from an ink pad or chalks no problem cutting stencils from card stock.

My first attempt I put the lattice over the front panel and rubbed Recollection Seafoam chalk ink over the stencil. I didn't think of the ink showing through for the butterflies. Then after removing the lattice I placed my butterfly negatives where I wanted them. I then added alcohol ink to the moulding gel and with just a little bit on a brush brushed it over the negatives. This is where the mistake came in. When I went to pull the negatives up they stuck and came up leaving chunks of the stencil card stock on my panel or tearing the card stock panel itself. Believe me it was not a pretty sight. Of course if you want to use a card stock stencil with moulding gel for the world's ugliest card be my guest.

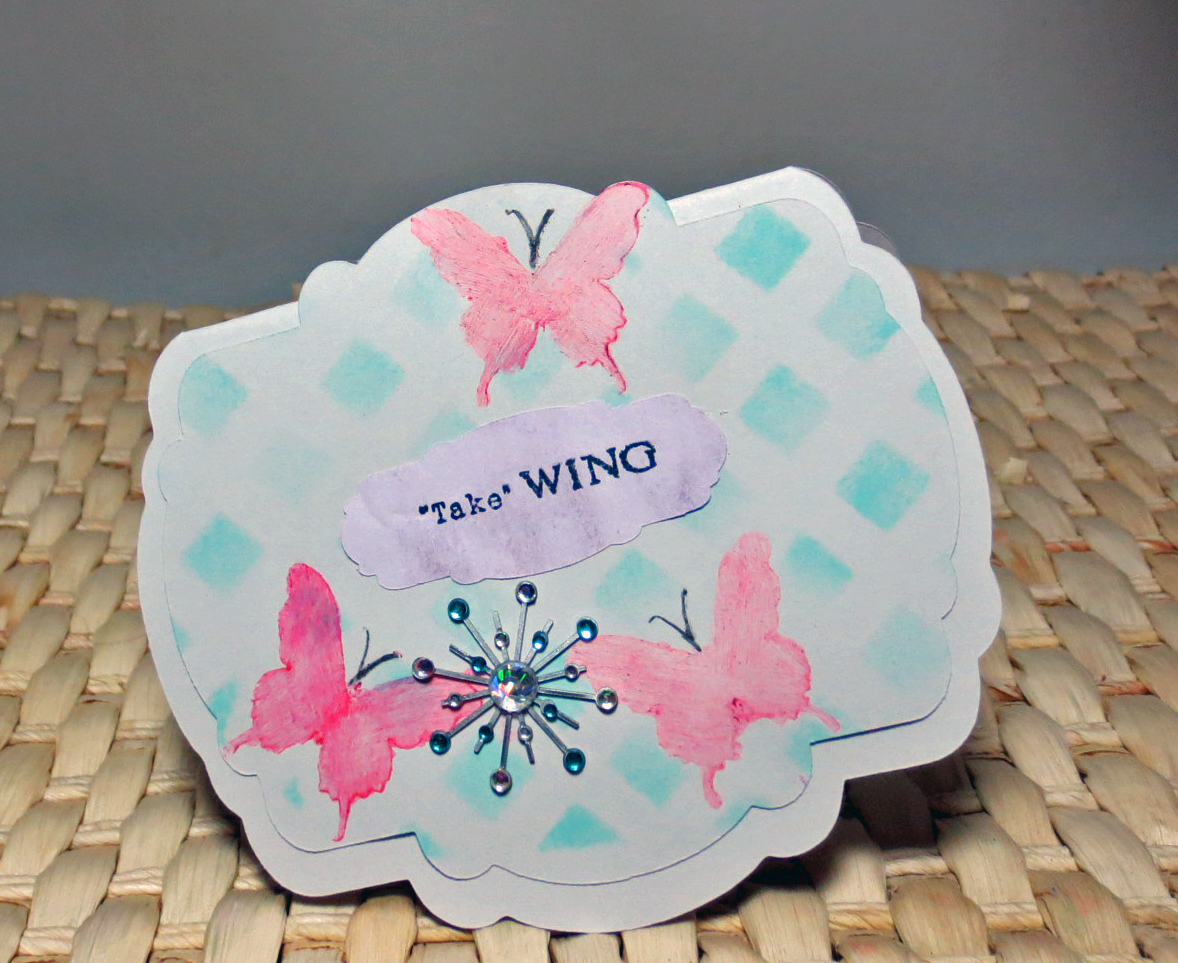
For this panel I cut the butterflies out of thin plastic. I taped butterflies over the lattice and used my chalk ink. Alas the one butterfly shifted a little bit but I decided to go ahead and use the panel anyway. After all not all butterflies are alike. After removing my lattice and  butterfly shapes  I taped my plastic butterfly negative where the shape had been. I used a color pencil to draw in the antennae  I mixed moulding paste on my craft mat with a  drop of alcohol ink to color it. Then using a brush with just a little amount of the mixture I brushed it over the stencil. I did one butterfly at a time immediately removing the stencil.  I accidentally taking the negative off of the first one smudged the moulding gel but decided to go ahead and continue instead of throwing the panel away. I think it gives it sort of a water color look.

The tag I cut from paper I made a long time ago. Playing with shaved pastels in water. The sentiment is from Inkadinkado "Inspirational Lift" stamp set. I used Memento Tuxedo Black ink. LOL! The only black ink I own.

Don't tell anyone but the brad is covering up a little oppsie. Ummm....make sure you use fresh masking tape to hold the stencil down and that the stencil is clean if you are stenciling multiple images. The brad is Sparkle Burst I believe by Karen Foster. Actually I think it adds to the card. :-)

There you have it my play on a blustery,rainy day. One thing I noticed is as the moulding gel sat for a little while on my mat the color became more intense.  Which is why the last butterfly I did is darker. I think the moulding gel has redeemed itself and will find a way into other projects. The jar does say it can be used as a gel transfer medium so I may try that next.

Thanks for stopping by and do come back. Wishing you Happy Frugal Crafting till we meet again!


Wednesday, January 23, 2013

"Be" UNIQUE Heart Shaped Card

One of my crafting intentions for this year is to try new techniques and to use my Cameo more in my card making. With that intention in mind I made a heart shaped card template,a stencil and mask in Studio. Then cut them out with my Cameo. Then it was play time with my different crafting supplies. LOL! Not only is the sentiment "Be" UNIQUE on the card but this is a unique card for me at least.
First I took the heart from what was one week a freebie. The Be mine scalloped heart to make my card shape.  Oppsie! The card won't stand up if the heart has a sharp point. So with my scissors I cut straight across. I think it may have been better if I would have made a top fold instead of side fold as it is really skinny where the card folds. I cut out a heart smaller than the card for my focal panel. Then cut out even a smaller heart to use as a mask.

 I was going to mist the card base with my color mist but ended up having to mist a separate heart as the card base fell apart. So I had to cut out another card base to place the misted heart on. The camera doesn't really pick up the shimmer.

For the pattern heart I taped my stencil which I cut out using the herringbone background cutting file which I believe was a freebie at one time. Then I taped my smaller heart over it by making a tape loop on the back of it. I squirted a dab of Lowes Cornell Aquamarine Metallic Water Color Paint onto my craft mat. Then took a cosmetic foam sponge and coated it with paint and dabbed part of it off on the mat. Then I dabbed over my stencil.  (I discovered that you want a fairly thick paint and not too much on your applicator. Acrylic paints will work.) Then I took off the stencil and my heart mask because it was on top. Placed my heart mask back down and rubbed chalk over my stenciled pattern.

I meant to rub chalk ink over the smaller heart but I was having so much fun with my blending chalk I had forgotten that was my original plan. This time I removed the heart mask and placed my negative from cutting out the mask taping it down and used a couple of different colors of blending chalk. Then I stamped my sentiment and small key using my Memento Black ink. The stamps are from Inkadinkado "Inspirational Lift". set. There are eighteen fabulous stamps to the set. Normally I don't like to stamp directly because I'm afraid that after all my work that I'll mess up stamping. However, these stamps are high quality and so far I have not been disappointed with the Memento ink.

I decided after I was done stamping to go ahead and outline the heart with a clear glitter gel pen. I took the negative again and placed it down and used my pen to go along the edge. Next time though I'll tape it down first so it doesn't shift on me.

Anyway it was fun to try some new techniques. Now I need to start a folder to hold the masks and stencils as they can be used again. I know I will use the herringbone stencil again with different media.

I encourage you to try new techniques. It can be fun as well as frugal using supplies you might already have on hand.

Thank you for stopping by and do come back again. Wishing you Happy Frugal Crafting till we meet again!

Sunday, January 20, 2013

Valentine Window Card

Right now until 2/4 there is a Moxie Fab Window Challenge.  So I decided to see what I could do along with more experimenting with making a little different window card.. Like usual my plans were changed as I played. Here is the card I came up with.
The card shape is from Silhouette's Christmas three tree card kit. I wanted a little larger card so re-sized it.  The cutout shape is from that file also. I just placed it so that the shape would cut out a window. I took another shape from the file and copied it so that I could make the frame.  I also cut out the transparency in the shape.  I cut two frames out of  scrap paper. This way the frame shows through the cutout on the other side and is pretty instead of just white. I sandwiched the transparency between the two frames.

I had a little accident with the inkjet transparency shape.  It looked like I had a small glob of glue on it  and since it was a scrap I cut it out of that is a possibility. When I went to clean the glue whatever is on it to allow it to be printed on started coming off. So I decided to experiment. I was able to take the coating totally off which gave me a clearer shape. I stamped with Recollections sea foam chalk ink. But because there was not a coating on the transparency it smeared. So I cleaned the chalk ink off and re-stamped with the chalk ink. Then I happened to have sea foam embossing powder so I went ahead and used that otherwise a clear embossing powder could be used..  I heat embossed very carefully not holding my heat tool too long in one spot so that the transparency wouldn't melt. The stamp is Antique Brocade by Hero Arts.  

I cut out by hand the shape of the card out of practice rice paper for the inside since it will not cut with my Cameo. I then used breeze Recollections chalk ink to color it. Because my Valentine's Day stamp is so long it would have showed through the opening. So I stamped Happy on the top and Valentine's Day on the bottom. I then decided to make a couple of heart embellishments for the inside which would show through the opening on the front. First I rubbed Recollection pansy pigment ink on the card stock hearts. Then I had to play with some Distress Crackle Picket Fence Paint I had just bought.  So I brushed that on the hearts. When it was dry I took my finger and rubbed more pansy ink on it. Then I heat embossed it with clear Ultra Thick Enamel in my convection oven.

I was so busy playing that I totally forgot that I was going to paint the gray card stock. Alas my white card stock does not cut nicely so I went with the gray with the idea of changing it. Still I like the way that the card turned out.

My frugal tip is to don't be afraid to experiment. Also if you do have cutting files look at them and see if perhaps you can do something else with them.

Thank you for stopping by and do come back. Wishing you Happy Frugal Crafting till we meet again.

Tuesday, January 15, 2013

U R My Sunshine Card

Right now over at Stuck On U Sketches there is an interesting challenge going on. The challenge is to replace  one letter with a die cut shape in your title. As well as to use scraps if at all possible  I decided to see what I could do. This is the card I came up with using my own take on it.

If you have been following my blog you know that I am a frugal crafter. A company several months ago was giving away free ledger pads along with other office supplies that they no longer used. I had not done anything with the ledger paper and since this year's intentions is to use what I have on hand I decided to use it for the background.

The large sun was cut from a piece of white card stock left over from a print and cut. I heat embossed it with Zing gold embossing powder. It was a free Silhouette file and still may be.

The phrase sunshine at one time was a free weekly offering from Silhouette. I decided not to use the "You are my" that was part of the phrase. I don't remember what font I used for the U R and MY. I welded the letters together for the MY. With the knife tool in Studio I cut out the u in the sunshine phrase and replaced it with a smaller version of the sun. Welding it to the s. Then welded it to the rest of the phrase. I also replaced the heart that was the dot for the i with a smaller sunshine. I colored the suns with a yellow glitter gel pen. The sentiment was cut out of scrap calligraphy paper.

Originally I had stamped Happy all over the ledger paper but when I placed the other elements on it it was too busy and detracted from the sentiment. I also changed my idea of having the U R MY straight on the card. Sometimes I find I have to play around. until I get something that I like.

Besides my intention of using what I have on hand more I have the intention of using more the different features in the Designer Edition of Studio. A challenge like this is perfect. Especially since it requires me to think and figure things out. Luckily Studio has an undo icon which gets used a lot. LOL!

I encourage you to try this replacing a letter in a title or sentiment with a image. Also I encourage you to use what you have on hand. Especially all those scraps which are taking over.

Thank you for stopping by and do come back again. Wishing you Happy Frugal Crafting till we meet again!


Friday, January 11, 2013

Faux Chalkboard Valentine

I've been wanting to play around with the chalkboard look for some time but seems like too many other projects have come up. When I saw a chalkboard Valentine card and saw where Moxie Fab has a challenge to see what you can use for a stamp besides a traditional stamp I decided to go ahead. Oh you don't want to listen to me ramble you want to see the card. O.K. Drum Roll Please! (Click image to enlarge)
The chalk board and frame is the scallop label in the Studio library which I re-sized. For the frame I did an internal offset. The black is some cheap black card stock I bought at JoAnn's a couple of years ago. For this you don't need high quality and in fact construction paper would probably work just as well.

For the stamping I used white embossing pigment ink. You want to use a craft ink otherwise known as pigment ink or chalk ink for this. Because pigment ink doesn't dry as fast you can smear it a little with your fingers like I did. The love stamp is from Karen Foster Valentine's Day set. The small valentines are from G Studio. I bought the set last year for a dollar. The middle valentine is using a plastic craft dedicated cookie cutter by Wilton. I will not tell you how many decades I've had the set of graduated size hearts but after my son left home I dedicated them to crafting. It was easy to just ink it up and stamp. Actually I got a better image with my practice but since this is a chalkboard after all the small breaks in the line add to it.

I used my metallic chalks to color the hearts only because I wanted a little bit of subtle sparkle and color. I could have just as easily used my soft regular blending chalks. Then I randomly took the white using a cotton ball and wiped over the whole chalk board. Then took my finger wiping off in places.

There you have it my quick and easy faux chalkboard card using everything I already had on hand. I was going to use some Valentine paper I have for the background but after playing around thought it detracted from the chalkboard which is the focal point.

 If you don't have chalk but have color pencils I've seen those used to add some color as well as white used to give more of a chalky look to the black. Also some people have used white embossing powder to try to get that chalk look.

Thank you for stopping by and do come back. Wishing you Happy Frugal Crafting till we meet again!

Wednesday, January 9, 2013

Valentine Card And How I Heat Embossed Small Hearts

I am in creating Valentine's mode. However what I start with and what I end up with seems to be two different things.

 I was recently sorting through a drawer and found a package of  Valentine's type things that had been mailed to me last year. I had gotten the package after Valentine's Day. I ended up using only one sticker from the package as I didn't like the papers with what I had in mind. Here is the card.
I started out with the idea of using this mat. The cutting file is by Sylvia Fernie. It is cut out of a scrap of pearl card stock that was used on the previous card as are the hearts by the sentiment. I backed it with a scrap of pink vellum.

The Sticker in the middle is from a Me and My Big Ideas sticker collection. The small hearts were left over from the snowflake ornaments I made at Christmas time. I heat embossed them with Raspberry Pearl embossing powder the same one I used for the sentiment.

I wove Scrapper Floss by Karen Foster in the holes. I then wrapped the ends around a pencil to get them to curl.

The sentiment is a stamp from the Karen Foster Valentine's Day set. It is heat embossed on a scrap of pink vellum.  The card stock behind it was an after thought when I saw a scrap of it on my work table. After deciding to use it I ended up changing the color of blank card. The small hearts hide the glue used to attach the vellum,

Normally I would use my heat gun for embossing. But because the hearts were so small that I used in the square and would be difficult to hold I did something different. I stamped my embossing ink on them like usual Then carefully placed them on a piece of foil. Instead of pouring embossing powder on them I sprinkled it on using my fingers. In some places it was heavier than others and that is all right as I did not necessarily want an even coat. I then placed the foil with the hearts in my portable convection oven.

 Because the oven was not preheated it took about a minute for the embossing powder to melt. It is trickier heat embossing that way as it is easy to scorch what you are embossing. Also some embossing powders melt quicker than others so you really have to keep a close eye on it. Even though there was some embossing powder on the foil my hearts didn't stick tight. The small melted pieces not on the card stock broke off when I lifted them off.

Well that is all for now folks! Thank you for stopping by and do come back. Wishing you Happy Frugal Crafting till we meet again!

Sunday, January 6, 2013

Broken Border Distressed Valentine Card

My good friend Beth Normal from Sunflowers and Dragons has made several cards which she calls Broken Border.  I like the look of them but alas while I was designing this card I did not like the look with my phrase and so modified it.

Here is my first Valentine of the year and it isn't even fussy with ribbon and lace. I think it would be perfect to give a man.
First I drew a rectangle in Studio. Then taking the wave knife in Designer Edition I cut the rectangle in half. I always like to see how things look on my work space before cutting so moved the pieces apart and added the love phrase and hearts. I didn't like how it looked. I deleted the bottom and copied the top part and then flipped it for the bottom panel. Next time though because the way the embossing would have turned out as far as pattern goes I will do it as I originally did. LOL! Just little things I don't think about.

I saw this technique using embossing folders and loved it. First I heat embossed my panels with copper powder although any color will do. Instead of cutting the panels out of white I cut them out of the same  pearl card stock I cut the hearts and love phrase from. I found my Darice layered heart folder that I bought last year. I think the dogs had been crafting with it because it was on the floor behind a piece of furniture. (By the way Amazon carries this folder if you would like to buy one. Not that I would enable you.to spend money.)Then embossed like I normally would. I could have left it like it was but I lightly sanded it so that some of the card base color showed through. Interestingly the pearl sheen dissolved leaving a slightly darker color.

The love was made by welding letters using Lucida Handwriting and Lucida Calligraphy. The small hearts are made from the heart charm in the library. I ungrouped and deleted the small circle and the inner piece.

There you have it my frugal Valentine card. I already like usual had everything on hand. The pearl card stock was in an assortment of 12x12 medium card stock that I bought almost two years ago on sale. I have no idea who makes it which is a shame as it cuts beautifully with my Silhouette.

I hope if you have an embossing machine that you will try this technique. By the way heat embossing then using an embossing folder is a great way to use card stock that may have faded,gotten stained,or suffered a stamping mishap. Not that any of you would have card stock that suffered from some bad condition like that. Especially no chocolate stained pieces. LOL!

That's all for now. Wishing you Happy Frugal Crafting till we meet again.

Friday, January 4, 2013

Embossing Mania Thanks Card

O.K. I must confess that I went crazy heat embossing yesterday. I wanted to try a couple of ideas I had .I wish I could have gotten a better picture as the picture doesn't totally do it justice. But you can see some of the sparkle.

I embossed card stock using the Sizzix Best Friend background embossing folder. Then I rolled clear embossing liquid over it and used Raspberry pearl embossing powder. I didn't like the raspberry pearl so then used white pearl over it. I didn't totally like that and so used vintage lilac embossing powder which is really sparkly. Some of the white and raspberry bubbled up through the lilac and gave the piece an interesting look.  I love how it turned out.

I created the word Thanks using two different fonts and welding them together. I used Arial and Bookman Old Style. I started with the Arial and used that font for every other letter. I cut the phrase out of a scrap of vanilla card stock. I heavily applied  liquid embossing. I sprinkled first silver by rubbing it between my fingers and letting it randomly fall on the letters and then I added the raspberry pearl the same way. I heat embossed like normal. I love the way the phrase turned out.While heat embossing I discovered that the way the letters were welded there was enough play to arch the phrase on the card. I like that better than my original idea to have it straight on the card.

The flower is also cut out of a scrap of vanilla card stock. I used silver and raspberry embossing powder. I love the resulting color when the two are blended together and will keep it in mind for future projects. The color did get deeper on the flower when I used the rake tip with the Hot Boss Embossing Tool. I used the Bejeweler Pro to add a small pink rhinestone in the middle of the flower. I first used the tip to make a dimple in the center. Cleaned it off good on scrap paper and carefully put my rhinestone in the tip. It was so easy to use and I was able to get the rhinestone exactly when I wanted it.

 I love the way this card came out so much that it is going to be difficult to let it go to a new home. However, knowing that it is going to bring a bit of joy makes it easier. Do you ever make cards for people and then have a hard time parting with them?

That's all folks. Thank you for stopping by. Wishing you Happy Frugal Crafting till we meet again!


Wednesday, January 2, 2013

Starting New Year Off Playing With Heat Embossing

First off I want to wish everyone a Happy New Year. May it be a rocking craft year for you.

 I gave up making resolutions instead I now make intentions. For some reason I don't feel so bad if I don't keep an intention. And intentions can change if the need arises. So my intentions this year is to create a craft room for myself so that I won't have crafting supplies scattered everywhere in two rooms and don't know where things are. My other intention is to try new techniques and to stretch my creative muscles. There is no better way than to make a thank you card using some new techniques while at the same time using a photo for inspiration.


The card base was distressed by rubbing it with sandpaper.The border was actually an A2 full size but I trimmed it down. It was embossed using Sizzix scallops and lines embossing folder. I heat embossed it with two different embossing powders. Raspberry pearl by Recollections and a lilac glitter one. I used  liquid embossing liquid with a dauber. If I were to do the same thing again with this folder I would use an embossing pen which would give a crisper look.But for this card I like the shabby look.

 I was playing with several different fonts so I don't remember which one I ended up using to cut out Thanks. I will have to look through my list as I like this font and it cuts out nicely.

The flower is a flower from the Studio library. I just deleted some of the lines as I wanted a more solid flower. I really had fun texturing it using embossing powder. I first heat embossed using a white. Then I used a dauber embossing liquid and randomly daubed on it and sprinkled on Recollections Eggplant Pearl and heat embossed again. Then I took the Hot Boss Embossing tool with the rake accessory. I dragged it through the embossed surface at different angles. You could probably get the same type of effect dragging a  comb through an embossed surface while heating with your embossing gun. Although I heat embossed the lilac glitter in the center of the bottom flower it doesn't really show through the cut out of the top flower. I thought the white and purple would give me a lighter purple but it didn't Still I like the effect that resulted. I will be making more flower embellishments this  way.

 The leaves are another Studio file that was free. I inked them using a paper towel with Stazon Cactus ink. The paper towel gives a little different texture effect than a cotton ball. I thought of going over them with a different green to come closer to the green in the photo but decided to leave them as they were.

Here is my inspiration photo.

As you can see I tried to use the colors from the photo My green is a different green though.Also the flower turned out a darker purple. I also layered the flower instead of the half circle near the top right hand of the photo. I would have loved to use more flowers layered but since this card is being mailed I was concerned about it being bumpy. You will notice on the left hand side there is a straight narrow line. Which gave me the idea to use the border. The leaves sort of echo the wavy green line on the left. I was going to have the word thanks be vertical to echo the vertical lines but I ended up liking the letters better horizontally.

This card is being entered in the Silhouette Plus card challenge for January. If you have a Silhouette feel free to join us for this challenge.

I can't wait to play with the Hot Boss Embossing tool again. Mrs. Claus at the North Pole knew I would have fun with it. If you like to add texture perhaps you can find one somewhere. They appear to be discontinued and I don't know of a similar tool. A wood burning tool kit would have some of the accessories that the Hot Boss comes with.

My frugal tip is to play with supplies you already have and see what you can come up with. I am going to be seeing what I can come up with using my ceramic tools with heat embossing since I no longer create ceramic pieces.

What are your intentions for the New Year? Also if you have any frugal tips to share I would love to hear them.

Thanks for stopping by. Wishing you a year full of Happy Frugal Crafting!